Pages

Monday, July 28, 2014

BELIEVE

Hello friends! Today I am sharing a layout created for Gina's Designs, which is very close to my heart.


I used two of the stackable labels to make a cross, using gold tinsel embossing powder. I added one of the white cardstock doilies, under the round sentiment, and placed it on top of the cross with a few pop dots.  I then placed a crocheted doily underneath the cross. 


I have been saving the gorgeous chipboard wings for something special! I embossed the wings with a pearl like embossing power called Angels Dust Ruby. I tried to capture some of the beautiful colors and shimmer from the embossing powder in this photo.


I used dry fine star dust glitter for the word Believe.

Gina's Designs Products


Other Products

Kaisercraft BeaYOUtiful cardstock collection
Prima resin angels
Prima photo frames
Prima Valentine red vine
Angel Wings Ruby embossing powder
Gold Tinsel embossing powder
Stardust dry fine glitter
White chalk ink
Pearls
White doily from Etsy

Thank you so much for stopping by today. Don't forget to make time to create something beautiful!


Monday, July 21, 2014

Country Gals

Hi friends! This is Donna here today to share a layout using some of Gina's chipboard shapes! I was inspired by the Build a Layout - Country Living collection. There are 5 really cute items in this pack. I did not use three of the items, the windmill, an old water pump, and a wooden window that you would find on a farm or in the country. All of the items are great designs and I cant wait to use the other items in a new layout! When I saw this collection I immediately thought of a photo of my granddaughters, in their sun hats, in the country in Virginia!

I tried something a little different with the paper. After putting down the first couple papers to frame the page, I added torn sections of  paper to create the background for the country scene. I added two borders to the page before adding the embellishments. I think the red gingham paper enhanced the "country" look. I then fussy cut the two girls from the photo. I used pop dots on the back of one of the girls to give the scene some dimension.  I painted the chipboard pieces with gesso, with the exception of the chicken wire and birds nest. I wanted the natural look for those pieces. I embossed the words, Country Living, with fired brick embossing powder, then decided to add a clear medium over the top to smooth it out a bit. It's fun to try different mediums on the chipboard. I used several different shades of chalk ink and stamping ink on the fence, the wagon wheel, and the blue bird.  I outlined the fence and the bird with a marker to make them stand out, and I secured a few of the chipboard pieces with pop dots for dimension, the fence, the bird, and the birds nest on a branch.


Gina's Designs products

Other products
Graphic 45 French Country collection
Misc flowers, twigs, eggs from my stash

Thank you so much for stopping by today! Have a great week!


Tuesday, July 15, 2014

Vintage Trinket Box

Hi scrappy friends! Today I would like to share a trinket box I assembled and decorated from Gina's Designs. This is a great item to make as a gift or just to keep all your special trinkets and scrapbook goodies in. It is a great size, sturdy and very easy to assemble. The dark color hardwood is a beautiful, smooth, semi gloss brown color. I almost hated to cover it up with paper! I am going to use it to store my new obsession, greeting cards and note cards with vintage images from Victorian Trading.
The first thing I did, before I assembled the trinket box, was to take each piece and trace an outline on the paper I chose to cover the box. You have control of which parts of the paper you will use for each section.  It was very easy to cut out the shapes and glue them to the hardwood pieces. I did not paint the sections of the box that would not be covered with paper. As I previously mentioned, the hardwood is a very beautiful color. Then being very careful to attach the paper to the correct side of the hardwood sections, I glued the paper in place.  If needed, take a small file of some type and gently sand/file down the areas your paper may not fit exactly over the shape of the base and lid of the box. I had a lucky day, mine fit perfectly!

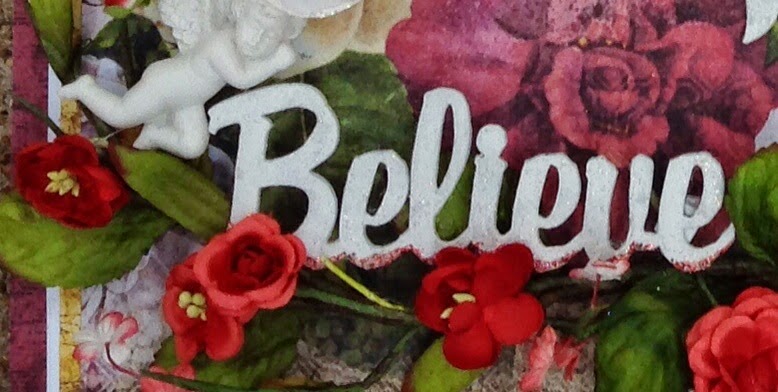
And then the real fun begins when it's time to add the embellishments: a few fussy cut flowers, paper flowers, gold lace, cameos, pearl sprays, pearls, crystals, and I added a couple of birds on branches from Gina's Birdwatching Shape Set.  I covered the chipboard shapes, with gesso, let them dry, and then painted the two birds with antiqued bronze crackle paint. The branches were painted with artichoke shimmer texture paint. I wanted to keep the chipboard simple because there are a lot of embellishments on the box. And I added a brass handle to the lid. There is a pre-drilled hole in the lid if you need it. There are so many beautiful knobs and handles out there to choose from for this fabulous box!
It was very hard to capture, in photos, how beautiful the muted colors of the paper and flowers work together, and how pretty the brass stamped cameos and handle are. The flowers and tips of some of the leaves are misted with gold shimmer mist. They really have a beautiful sheen in person. I also added paper to the inside of the box. 

Gina's Designs products

Other products
Fabscraps Heritage paper
Gold sparkle lace from Tresors de Luxe
Brass stamped cameos and frame from Etsy
Gold pearl sprays
Gold shimmer mist
Misc jewelry pearls and crystals
Flowers and leaves from Prima
Misc flowers from stash
Antiqued bronze crackle paint
Shimmer texture paint-artichoke
Crafters Pick - glue

Thank you so much for stopping by! I hope that I have inspired you to create something beautiful!

Saturday, July 12, 2014

Ooh La La

Today I am sharing my Artist Trading Blocks from Gina's Designs!  I chose to decorate my blocks with a Paris theme.  Ooh La La!  They are so easy and so much fun to put together and decorate! The options are endless! I also used Gina's miniature dress forms on all four sides of the three boxes. It's really great that you can special request Gina's chipboard shapes in many different sizes! The tiny dress forms I used on the two smaller boxes are a special requested size, and are so darn cute!!!!!!!!


After I glued the boxes together, I painted the corners black with chalk ink so the color of the box would not show. I could have also used black gesso or paint.  I chose the paper I wanted to use for each box and each side, including layers, cut them, and glued them to the box. I then got out "the works" and just started having a blast! Pearls, feathers, bling, flowers, lace, glass knobs, shabby ribbon, netting, stickers, and wooden feet!


Then it was time to decorate the dress forms! I painted all the dress forms with gesso, with the exception of the black ones. I used black chalk ink directly on the chipboard and that worked fine. I would have probably used black gesso if I had it.  I find it best to cover my chipboard shapes with gesso as a protective coat before painting or embossing.  I used vintage pink chalk ink, over the gesso, on the darker pink dress forms. Two of the little white dress forms are covered with white opal liquid pearls, and the other set with white chalk ink and spun sugar distress stickles. I was having so much fun with the darling dress forms, I also made two free standing dress forms! I added a piece of cardboard to the back so they could stand up!


 Gina's Designs products


Other products 

Authentique Classique: Pretty paper and sticker sheet
Glass knobs - Hobby Lobby
Feathers
Flowers
String pears, Black and White
Wooden feet - Hobby Lobby
Lace - misc from stash
Chalk ink - Black, vintage pink, white
White opal liquid pearls
Spun sugar distressed stickles
Crafter's Pick glue

Thank you so much for stopping by today! I hope I have inspired you to make something beautiful!!!!!!

Monday, July 7, 2014

Fireworks!!!

This is my first layout for Ginas Designs! I am so excited to be on her design team!

The 4th of July is a big deal for us because we live next to a high school that puts on a fantastic fireworks show! Friends and family come over and sit in our front yard in lawn chairs and watch the spectacular show! That is my inspiration for my layout!

I love items that frame a photo. I used the chain and gears frames from Gina's Designs for both photos. I simply cut off the gears for this layout. I painted the frames with gesso, and used fired brick crackle paint. Not so much for the crackle, but because of the color/texture. I dabbed some red ink to brighten up the color. I did the same thing on the two stackable labels under the bow. I debated about leaving the chipboard natural. I love that look and I think it would have worked well with the burlap and the bow.

Gina's Designs Products

Chain and Gears Frame
Stackable Labels

Other products used

K&Co Americana paper
Distress crackle paint-fired brick
Gesso
Bone and red floss
Red ink pad
Vintage brown ink pad
Round pop dots